Wet weather + sick baby = craft time @ home!!!
Yes, William is sick with bronchitus and the wet weather has left Ruby and I at home with nothing but our imaginations - and we went wild.
Here is a snapshot of the things we created this week and a quick rundown on how each item was made. This is more like a picture gallery (except the first one) - as they are so simple to make, detailed instructions aren't needed and all you neeed to do is to look at the picture to see what we used.
Re-planted our vegetable garden


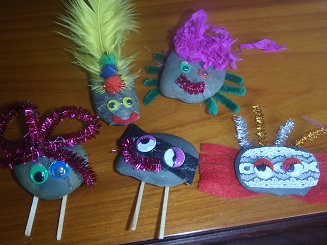 |
| Little Characters Kids love creating their own characters. You can do this by gluing eyes on anything from old socks, rocks, pine cones, old containers - ANYTHING!!! |
 |
Using a template
We used our teddy bear templates to make 'Nanny'and 'Poppy'. Sticking a magnet on the back means that they can be stuck on the fridge.
We used paddlepop & matchsticks to make the bed and ladder
|
 |
| Bird seed hanger Mix peanut butter, honey (or maple/golden syrup) with bird seed and mould it onto a pine cone - no measuring required, just make a sticky mixture. Simply hang out in a tree. We hung ours on our home made bird feeder - the parrots love it!  |
 |
| Gift Boxes
Ruby decorated a gift box (pkt of 3 boxes $5) using
various objects from our craft box. Inside the box
she put the bracelet she made herself using foam beads ( $2 pkt),
wool & a plastic childrens needle. Put anything inside!
Don't have a gift box? Use an old tissue box or food packaging.
Wrap in foil, gift wrap or paper to give you a blank canvas. |
 |
Doggy Treats
We made home made doggy ice blocks - simply fill
a container with old meat or doggy treats and fill with water.
Zada loves biting through the ice to get the meat - great
doggy treat for summer!
|
Fairycrow
We made a fairycrow for our garden. Ruby's step brother Jaidyn came to help put too. Here are some step by step photos. This took about an hour.
 |
Get ready
Materials: old fairy dress, wand, wings, wig, fishing line, needle,
old stockings, hay ($7 from local produce or try a hardware store), gluegun
and craft items for eyes, mouth, shoes etcUse anything you think - make a family member or animal or find the clothes first and go from there! |
 |
Stuff the stockings with hay
I used two of Ruby's old stockings
to make the legs (pink) and the body/arms (purple)
|
 |
Making the head
Using another pair of stockings. Cut the legs off. Tie off the ends, fill the 'bum' part with hay to make the head |
 |
| Put it together I used fishing line to sew the two paris of stockings together (at the waist).
I then sewed on the head
and dressed our fairycrow. |
 |
| Decorate Head Jaidyn used the hot glue gun to stick on eyes (pom poms & googly eyes) and a mouth (sparkly pipe cleaner). I used fishing line to sew on earings (bells), a wig and a crown. |
 |
Finishing Touches
We then glued on a wand, some shoes, bracelet and a necklace
(that we made). Now you are finished and ready to put it in the garden.
|
 |
| Our fairycrow is in our vegetable garden under a little awning. If it was out in the weather, I would have added a childrens umbrella to the post to add some protection. Ruby loves our fairycrow! |
No comments:
Post a Comment